Secure SSH Access with Keys
SSH is something you’ll use a lot when accessing servers remotely, however you’ll want to tighten up the security of any server allowing SSH connectivity if it lives on the public internet.
One way of making SSH access more secure is locking down the supported authentication mechanisms. A good option is to use cryptographic key based authentication (and realistically disabling password authentication afterwards, which I cover here).
I recently used Ansible to automate creation of a minimal Ubuntu Server on-demand within Azure to lower my Public Cloud costs.
I used SSH keys within the Ansible Playbook to ensure the created server was only accessible by myself using a specific SSH key I generated that Ansible can assert. My Playbook configured a Virtual Machine, vNet & NIC that deployed directly via a Public IPv4 address within Azure so I needed to make sure SSH was effectively locked down to just myself.
In this guide, we will only be focusing on generating the SSH Key, Installing it on your client & configuring SSH to use this key as the authentication mechanism for a specific user.
However if you are interested in Ansible & Azure, see my guide on Using Ansible Galaxy for Microsoft Azure Automation or my posts for Ansible & Azure for more information.
While there are multiple kinds of key that any given server’s SSH daemon and client may support, this article will be using an RSA key.
Expectations
You have a server and root access to it.
You have a server that allows SSH connectivity.
You have access to the server over SSH.
You have an SSH client that can already connect to your server with.
You currently use the Username & Password authentication method successfully without issue.
You wish to allow the SSH Key authentication method for a specific user.
We will be creating a new user to do this with the more basic low-level unix tools groupadd, useradd & usermod.
Given Example
Our Server is a GNU/Linux Server called “SSHS” running OpenSSH,
Our SSH Client is a Windows machine running PuTTY called “WINC“.
We currently only have access to the root user for SSHS.
We have previously connected to SSHS as our root user.
We want to make SSH Key Authentication used for user “keyuser“.
This “keyuser” is a new user which we will create (you doesn’t have use a new user).
Our SSH Server SSHS has an IPv4 address of 192.168.1.100.
Our SSH Client WINC has an IPv4 address of 192.168.1.42.
Both our SSH Server & Client are in the same network.
Configuration Steps – SSH Server
Creating a new user (optional)
Firstly, we login to our SSH server as usual. In our example we only have a root user setup. We will create a new user and configure them as an administrator of the server.
login as: root
root@192.168.1.100's password:
Welcome to SSHS (GNU/Linux x86_64)

Last login: Wed Apr 01 12:34:56 2026 from 192.168.1.42
root@SSHS:~#
Now we use the root account to create a new user “keyuser” we’re going to manually specify many of the user’s aspects.
The user will have their own group created with useradd, also called “keyuser” which is default behavior on most Debian based distributions using this tool.
root@SSHS:~# useradd -d /home/keyuser -m -U -s /bin/bash -G sudo,users -u 1042 -U keyuserIn my example ;-
- I specify the UID and GID of this user & their personal group to both be 1042 with -u and using -U to ensure it creates a group for the user and makes this their primary group
- I specify the home directory as /home/keyuser with -d and use -m to ensure this home directory is created
- I specify the user’s default shell as BASH with -s /bin/bash
- I specify additional group memberships with -G to meet my user’s needs
In most use cases, you won’t need to be this specific; view the man pages for more information on groupadd, useradd & usermod to understand defaults and to use these tools to meet your specific needs.
We can then verify this user has been created & their group membership details with the groups command.
I then read the /etc/passwd file to verify that our new user “keyuser” has UID 1042 and their primary group is called “keyuser” with GID 1042.
root@SSHS:~# groups keyuser
keyuser : keyuser sudo users ✔

root@SSHS:~# cat /etc/passwd | grep keyuser
keyuser:x:1042:1042::/home/keyuser:/bin/bash ✔
While logged in as root, I set the password of my user “keyuser” with the passwd tool directly.
root@SSHS:~# passwd keyuser
New password:
Retype new password:
passwd: password updated successfully ✔
Finally for my use case, I will be using sudo to impersonate the user from my root account, which has the permissions to do so.
At this point you could just login as the new user or the user you want to allow SSH Key Authentication, locally.
root@SSHS:~# sudo -i -u keyuser
keyuser@SSHS:~$
Generate your user a ssh key file with OpenSSH
Now we use the OpenSSH tool ssh-keygen to create SSH version 2 RSA private & public keys (see the man page for more information).
keyuser@SSHS:~$ ssh-keygen -t rsa
Generating public/private rsa key pair.
Enter file in which to save the key (/home/keyuser/.ssh/id_rsa):
Created directory '/home/keyuser/.ssh'.
Enter passphrase (empty for no passphrase):
Enter same passphrase again:
Your identification has been saved in /home/keyuser/.ssh/id_rsa
Your public key has been saved in /home/keyuser/.ssh/id_rsa.pub
The key fingerprint is:
SHA256:U2f3Rixf6BJNjvT+f4K3vQLyE3fZS+lcravsyZA95QE keyuser@SSHS
The key's randomart image is:
+---[RSA 3072]----+
|            . .  |
|           . L o |
|          . O B +|
|         . L * =.|
|        S   + * =|
|     . o o = B.=.|
|      o + + *o+..|
|       o .o+.*o .|
|        ...=B..+.|
+----[SHA256]-----+
keyuser@SSHS:~$
keyuser@SSHS:~$ pwd
/home/keyuser
keyuser@SSHS:~$
keyuser@SSHS:~$ ls -al .ssh
total 16
drwx------ 2 keyuser keyuser 4096 Jul 16 18:15 .
drwxr-x--- 3 keyuser keyuser 4096 Jul 16 18:15 ..
-rw------- 1 keyuser keyuser 2610 Jul 16 18:15 id_rsa ✔
-rw-r--r-- 1 keyuser keyuser  574 Jul 16 18:15 id_rsa.pub ✔
This stores a user’s keys in their home directory.
In my case my private key is at /home/keyuser/.ssh/id_rsa and my public key /home/keyuser/.ssh/id_rsa.pub but this ultimately depends on the type of key you generate with ssh-keygen & what options you choose during generation.
Installing a Key for Authentication (with ssh-copy-id)
Next we can use ssh-copy-id to apply our public key (id_rsa.pub) for keyuser on SSHS (192.168.1.100) into the user’s authorized_keys file, which allows us to login with our RSA key instead of a password (or with one if a key passphrase is used).
keyuser@SSHS:~$ ssh-copy-id keyuser@192.168.1.100
/usr/bin/ssh-copy-id: INFO: Source of key(s) to be installed: "/home/keyuser/.ssh/id_rsa.pub"
/usr/bin/ssh-copy-id: INFO: attempting to log in with the new key(s), to filter out any that are already installed
/usr/bin/ssh-copy-id: INFO: 1 key(s) remain to be installed -- if you are prompted now it is to install the new keys
keyuser@192.168.1.100's password:

Number of key(s) added: 1 ✔

Now try logging into the machine, with:  "ssh 'keyuser@192.168.1.100'"
and check to make sure that only the key(s) you wanted were added.

keyuser@SSHS:~$
Installing a Key for Authentication (manually)
When we generate an identity (private) key the process provides us with a public key too.
Provided the public key (id_rsa.pub) is within your user’s authorized_keys file, SSH will allow login using the identity (private) key (id_rsa) for authentication. This can include keys generated elsewhere if you wanted to do so.
A manual installation could be done by effectively inserting the generated public key file id_rsa.pub into your user’s authorized_keys file in a suitable per-line format. Usually both files will be within your user’s ~/.ssh directory.
In my case this is putting /home/keyuser/.ssh/id_rsa.pub on a line in /home/keyuser/.ssh/authorized_keys, like so ;-
keyuser@SSHS:~$ cat /home/keyuser/.ssh/id_rsa.pub
ssh-rsa AAAA....bGzNlCss= keyuser@SSHS
keyuser@SSHS:~$
keyuser@SSHS:~$ cat /home/keyuser/.ssh/id_rsa.pub >> /home/keyuser/.ssh/authorized_keys
keyuser@SSHS:~$
keyuser@SSHS:~$ cat /home/keyuser/.ssh/authorized_keys
ssh-rsa AAAA....bGzNlCss= keyuser@SSHS ✔
keyuser@SSHS:~$
The format of the authorized_keys file is a per-line entry of public keys, space-separated fields to validate each identity (private) key file permitted to login. It also accepts commented lines using “#“. Each line technically uses the following fields ;-
- any options (often absent)
- a key-type
- a base64-encoded public key
- a comment (often the username@hostname)
…for a detailed explanation see the Debian docs on authorized_keys.
Testing Key Authentication with OpenSSH on the Server itself
Once we’ve installed our generated public key (id_rsa.pub) within our user’s authorized_keys file, we can now test this is working with a SSH logon attempt using the corresponding identity (private) key. I recommend trying this from within the Server itself first since the identity key (id_rsa) is on the filesystem already to confirm you’ve installed the public key to authorized_keys correctly.
The following is me using SSH to connect to the server from itself, pushing the identity (private) key into our connection & specifying we’re logging in as keyuser. This logs in without issue and doesn’t prompt for any username or password ;-
root@SSHS:~# ssh -i /home/keyuser/.ssh/id_rsa -l keyuser 192.168.1.100
Welcome to SSHS (GNU/Linux x86_64)

keyuser@SSHS:~$ ✔
We were able to successfully log into SSHS (from itself) as keyuser because we specify an identity key id_rsa to use and the corresponding public key id_rsa.pub is installed within their authorized_keys file.
Configuration Steps – PuTTY SSH Client
Now that we have proven that SSHS can be logged into by using the identity key of keyuser, we need to export the identity key id_rsa to WINC -our Windows Client- and convert it into a format that PuTTY is happy to use.
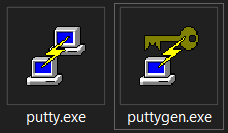
PuTTY has a toolkit called PuTTYgen that you can use to generate, import, convert & export SSH keys. We’ll be using this toolkit to instead take our keyuser‘s private key /home/keyuser/.ssh/id_rsa and converting it to a .ppk file, a PuTTY Private Key file format.
PuTTY uses these .ppk files to ensure that different formats like OpenSSH’s RSA or DSA can be understood as a single PuTTY compatible file type.
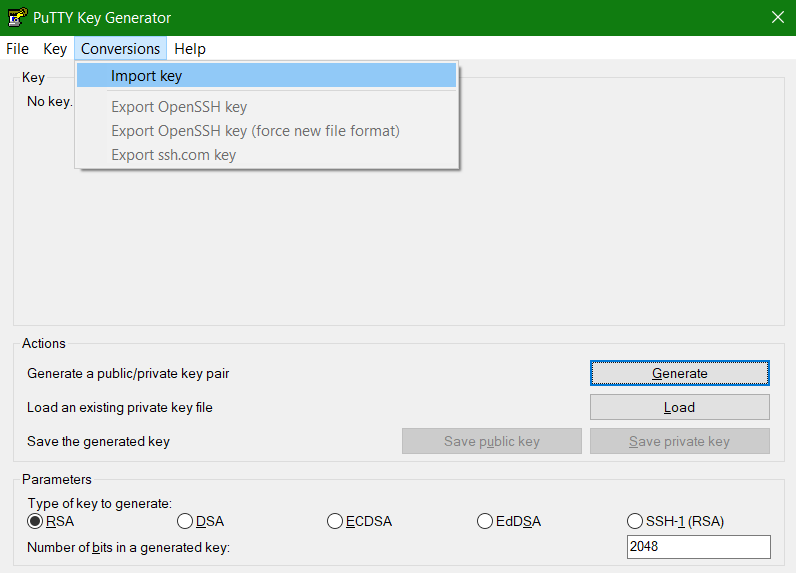
We start by getting our user’s identity (private) key onto our SSH Client machine with FTP, SFTP or SCP (I suggest WinSCP) then once the id_rsa file is available we can import this with PuTTYgen.
Select Conversions > Import Key ;-
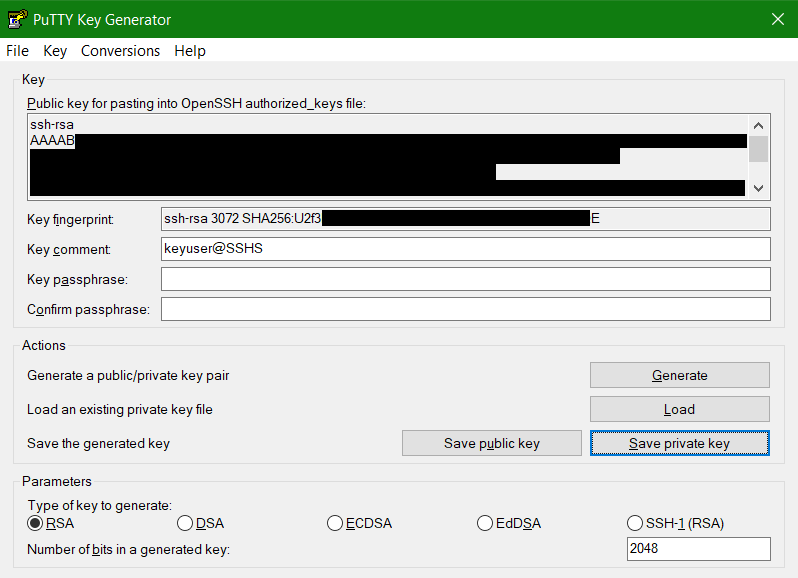
We take our OpenSSH identity (private) key we created for keyuser and using PuTTYgen we can select “Save private key” to convert this into a PuTTY happy .ppk file.
In my case I save this as “keyuser_putty_private.ppk” ;-
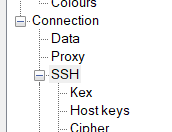
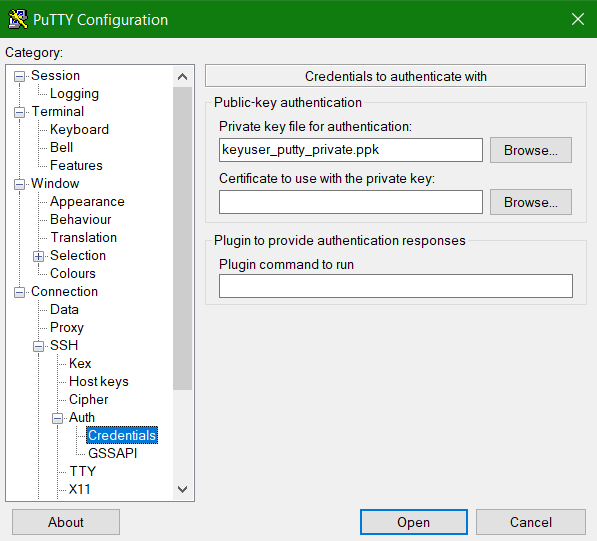
You’ll find the option to use a Private key file for authentication on the left-hand side under Connection > SSH > Auth > Credentials.
Here our newly converted keyuser_putty_private.ppk file can be selected within the PuTTY SSH Client’s configuration ;-
Once configured, the session can be started as usual ;-
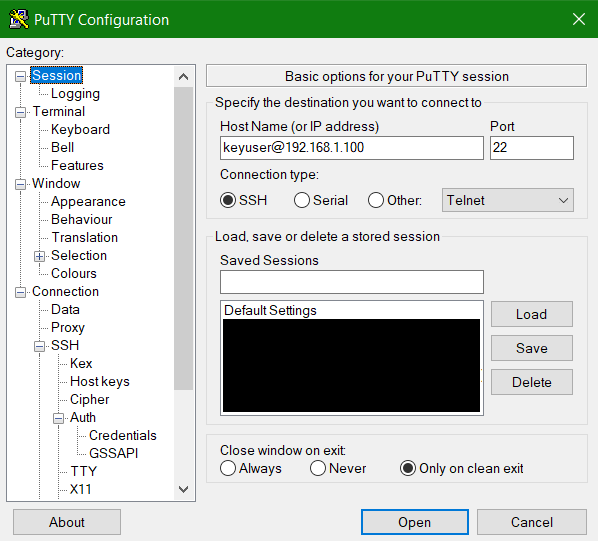
If you don’t specify the username in the Hostname / IP Address area then you’ll be asked for a username upon login. You’ll see confirmation from PuTTY on using public-key authentication ;-
Using username "keyuser".
Authenticating with public key "keyuser@SSHS" ✔
Welcome to SSHS (GNU/Linux x86_64)

keyuser@SSHS:~$ ✔
Diagnostic Help
I strongly suggest using the following to get a greater understanding of the tools used in this guide.
- PuTTY docs
- PuTTYgen docs
- ssh-keygen
- authorized_keys
- Also See